

deviceOwl - Checking Devices
Important: Before checking devices, to be sure you're getting the most out of deviceOwl's device identification capabilities, please review the Getting Started guidance (steps icon) available from the main screen of deviceOwl.
Tap the owl icon from the main screen to start device checking with deviceOwl.
Camera Access (Required)
Important: When reviewing the Getting Started guidance, or when you first start checking devices, you'll be asked to allow deviceOwl to access your phone's rear camera.
During device checking, deviceOwl uses AI to analyze the images that are received through your camera, to determine whether the device has a known match against it's device knowledge.
Location Access (Optional)
Important: When reviewing the Getting Started guidance, or after selecting the "Remember Device Locations" under "Detection Preferences", you may be asked to allow deviceOwl to access your current physical location, when checking devices.
deviceOwl can optionally remember your current physical location, when checking devices. Use this feature to help you recall where you were when you encountered/checked a particular device, for instance if you are travelling to multiple destinations.
This feature is optional, and you can choose to deny access if you prefer.
Note: If you want deviceOwl to remember your location when checking devices, check the "Remember Device Locations" option in Detection Preferences under preferences.
Selecting the Device Type
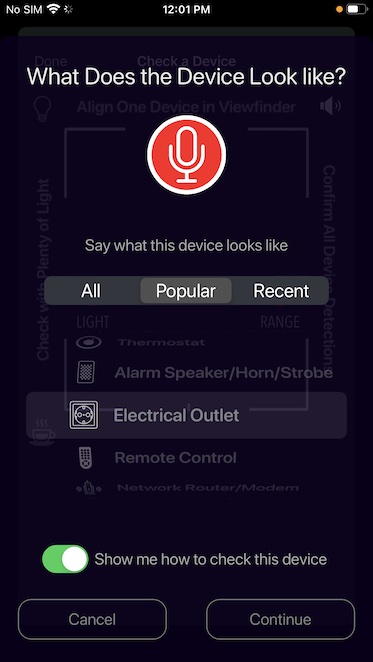
Before checking a device, you'll be asked to select what it looks like. It's important to select the correct device type, so deviceOwl has the best chance of identifying it.
Several device type lists are now available, to help simplify device type selection.
All Devices
Select "All" to select from the list of all available device types supported by deviceOwl.
Popular Devices
Select "Popular" to select from the list of the most popular device types that people are checking using deviceOwl.
Recent Devices
Select "Recent" to select from the most recent devices that you have checked using deviceOwl.
To clear the "Recent" devices list, select the X button to the right of the "Recent" list.
How to Select the Right Device Type
When selecting the device type, make sure to select what it looks like, vs. what you think it might be.
For example, if you think a device has a surveillance camera, but it looks like a thermostat, select "Thermostat".
If unsure, tap the microphone button and in a few words say what the device looks like. deviceOwl will try to find the most appropriate device type based on your response. There's no need to include the device brand or model number when saying the device type.
Examples: You can say "Smart Speaker", "Set Top Box", "Thermostat", or "Location Tracker".
Note: If deviceOwl is unable to identify a device based on the selected device type, try selecting an alternate device type that may also match the device you are checking.
Microphone/Speech Access (Optional)
Important: When reviewing the Getting Started guidance, or when you first start checking devices and tap the microphone button, you'll be asked to allow deviceOwl to access the microphone, along with the speech recognition capabilities on your device.
Allowing deviceOwl access to the microphone and speech recognition capabilities of your device allows you to conveniently say the type of device you want to check, vs. selecting it from one of the device type lists.
This feature is optional, and you can choose to deny access if you prefer.
Show me how to check this device
Select this option to review important guidance on checking the device type you've selected. This includes preparation and other specific steps required before deviceOwl can successfully identify the device.
Continue button
Once you have selected a device type, select "Continue".
If you have selected the "Show me how to check this device" option, the device checking guidance will be displayed, otherwise device checking will start.
Note: deviceOwl remembers the last device type that you selected, and allows you to repeat checking the same device type from the main screen, simply by tapping and holding the owl button for about 2 seconds.
Cancel button
To cancel device type selection, select "Cancel".
The Viewfinder
The viewfinder provides helpful, interactive feedback while checking devices.
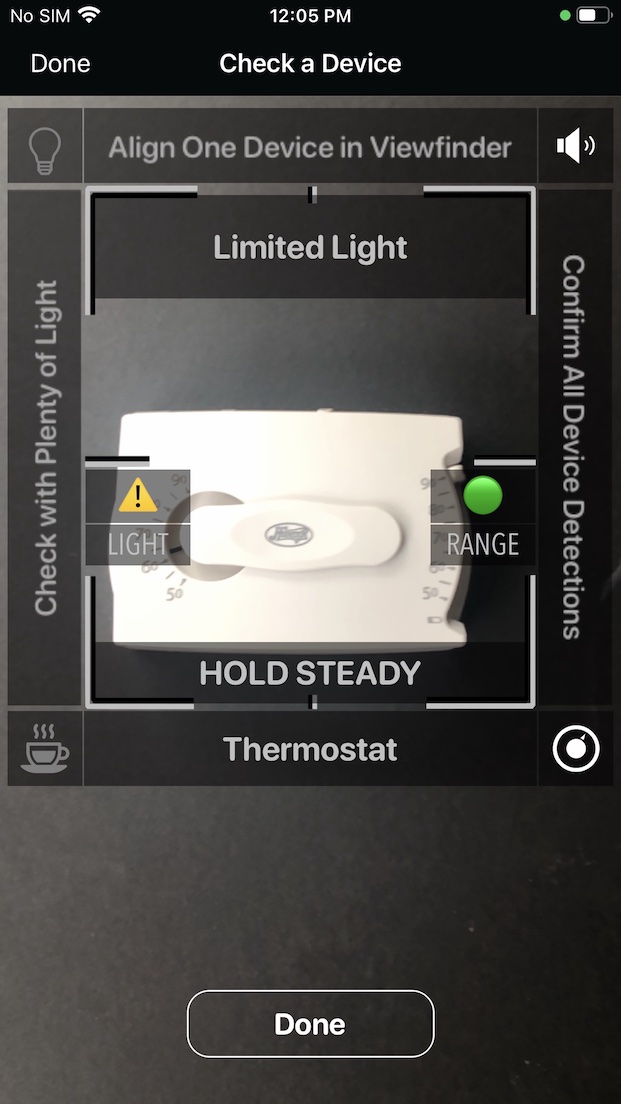
LIGHT Indicator
(Left Center in Viewfinder)
The "LIGHT" indicator provides feedback about the amount of ambient light currently available for checking devices:
⭕ - There is not enough light for checking devices
⚠ - There is some light, but it's not ideal
🟢 - There is sufficient light for checking devices
Additional feedback on the ideal amount of ambient light required to check the currently selected device type is also provided in the viewfinder, such as "Not Enough Light".
RANGE Indicator
(Right Center in Viewfinder)
The "RANGE" indicator provides feedback about how far your phone is from the device you are checking:
⭕ - The phone is not within range of the device
⚠ - The phone is within range, but it's not ideal
🟢 - The phone is within range of the device
Additional feedback on the ideal distance for checking the currently selected device type is also provided in the viewfinder, such as "Check Within 1ft of Device".
Several features can be conveniently accessed directly by tapping the available icons in the viewfinder.
EXPERT MODE
(Advanced Edition Only)
Note: If you have enabled "Expert Mode" under Preferences, both the"LIGHT" and "RANGE" indicators will display raw numbers instead of icons. Refer to "Expert Mode" in Preferences.
TORCH Button
(Upper Left in Viewfinder)
The torch button indicates whether or not the torch on your device is currently on and allows you to enable/disable it as needed. DeviceOwl automatically turns on the torch when there is not enough light available for checking devices.
Tapping this button will disable/enable the torch for the remainder of this device check. You can disable the automatic torch feature in Detection Preferences.
Important: The torch is not an ideal source of light for checking devices. Ideally there are other sources of natural light that can be used to illuminate the device.
SOUNDS On/Off Button
(Upper Right in Viewfinder)
If the sounds from deviceOwl get too much for you or others, simply tap this button to disable them.
You can enable/disable the sounds again by tapping this button again, or through Preferences.
COGNITION BOOST Button
(Advanced Edition Only - Lower Left in Viewfinder)
Tapping this button enables the Cognition Boost feature, which temporarily increases deviceOwl's sensitivity to help identify:
1) Devices that are partially damaged or worn
2) Devices that are have permanent marks that can't be removed
3) The possible manufacturer of an unknown device
Important: Using this feature increases the chances of incorrect device detections. Please use this feature only when necessary, and confirm all deviceOwl's device detections.
Cognition Boost will be turned off automatically after checking a device.
DEVICE TYPE Button
(Lower Right in Viewfinder)
The Device Type button indicates the currently active device type and allows you to select a different device type.
Tap this button if you need to select a different device type. For example, if you were checking a "Smoke/CO Alarm" and you now want to check a "Thermostat".
DONE Button
To stop device checking, select the "Done" button either at the lower center, or top left of the screen.
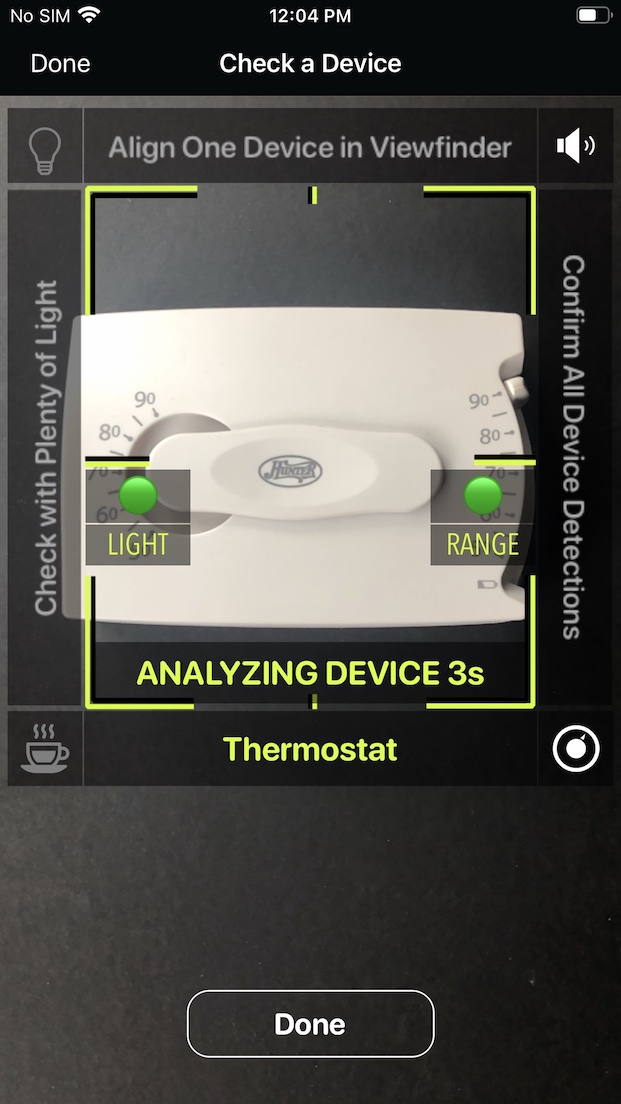
How to Check Devices
Checking devices involves aligning a single device, as large as possible in deviceOwl's viewfinder, while ensuring there is adequate light across the device.
To give deviceOwl the best chance at identifying a device, it's important to:
1) Select the correct device type
2) Align one device at a time, as large as possible within the viewfinder - refer to the "RANGE" indicator in the viewfinder
3) Have plenty of light across the device - refer to the "LIGHT" indicator in the viewfinder
4) Hold your phone steady while the device is being analyzed
When the viewfinder changes to green, you will see an "Analyzing Device" countdown timer and deviceOwl will start checking the device.
Continue to keep the device steady within the viewfinder, until the checking is complete.
Haptic Feedback
While analyzing a device, deviceOwl will provide Haptic Feedback (vibrate) when it detects features that are similar to devices that it knows about.
You can disable haptic feedback by unchecking the "Enable Haptics" option in Preferences.
Audio Feedback
If you have "Expert Mode" enabled in Preferences, deviceOwl will provide audio feedback instead of haptic feedback, when it detects features that are similar to devices that it knows about.
You can disable this audio feedback by unchecking the "Enable Sounds" option in Preferences.
Privacy Protection
Important: deviceOwl has a privacy protection feature that works to prevent human faces from being captured in the viewfinder during device checking, for instance from another person in the room or from a photograph nearby the device.
If one or more faces are detected, deviceOwl will display a message indicating "Avoid faces in viewfinder", and device checking cannot proceed until the viewfinder is free from facial profiles.
If you receive this message, simply reposition your phone so you can check the device from a different angle which won't include faces.
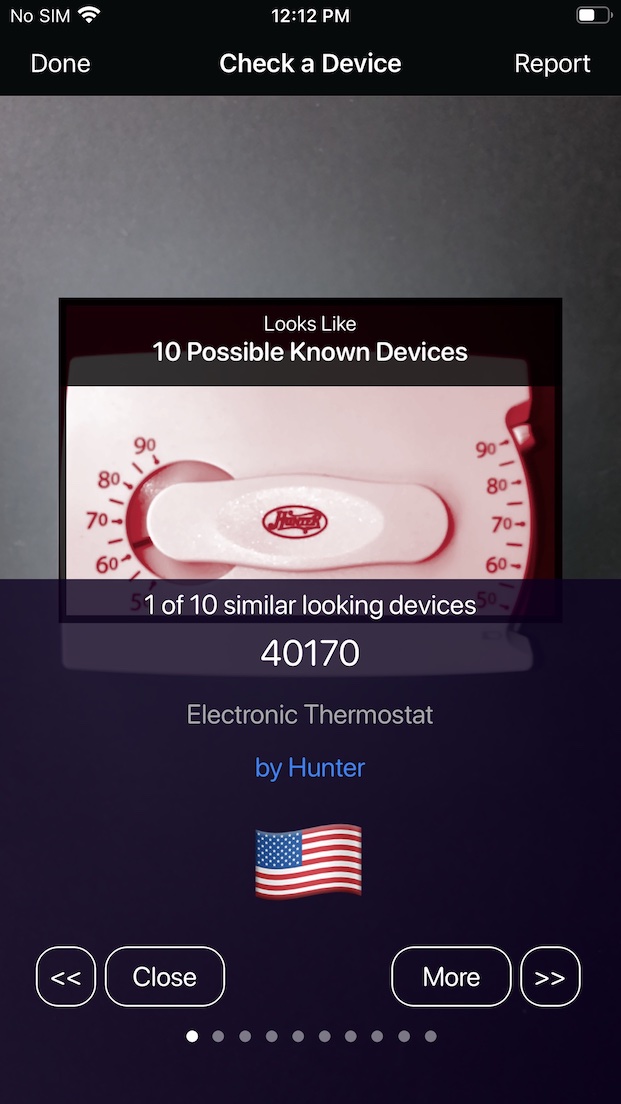
Device Detection
If the device is recognized, the viewfinder will indicate this with a detection box around the device, and display a summary of the device details in the lower portion of the screen.
Important: Before taking any further action on any device detection, please confirm the device detection using an Internet search using the reported device make and model information.
For more information, refer to Viewing Device Details.
Done button
(Top Left/Lower Center)
Select "Done" to stop device checking, and return to the main screen.
Report button
(Top Right)
If you feel the detection is incorrect, select "Report" to report the detection to Entropic Labs for analysis.
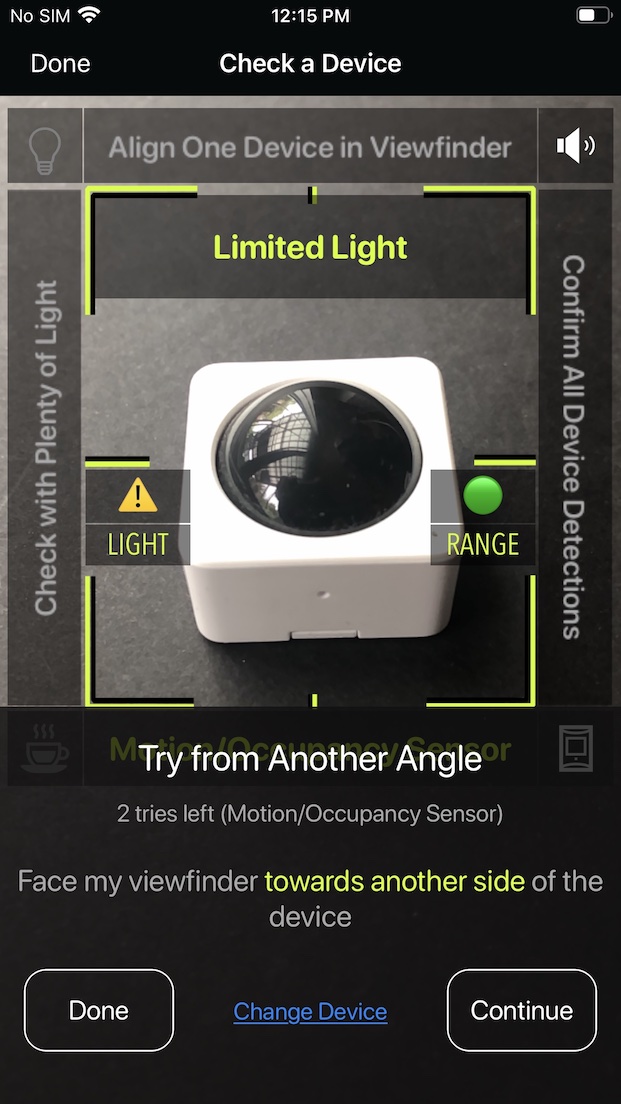
Checking from Different Angles
If the device you're checking is not recognized, deviceOwl will ask you to check the device from a few additional angles.
Doing this gives deviceOwl a better chance at recognizing the device, based on the way it has been trained.
Follow the guidance screen to check the device from the additional angles specified, such as "45 degrees down towards the front" of the device, as illustrated.
If its not possible to check a device from a specific angle, simply face the viewfinder towards the device at an angle that is different from the previous angles you have tried.
Note: If you don't want deviceOwl to ask you to check devices from multiple angles, you can uncheck the "Check from Multiple Angles" option in Detection Preferences under preferences.
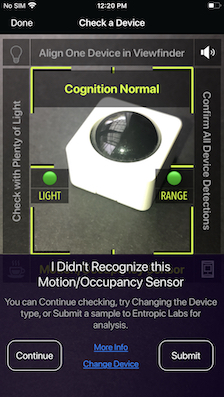
No Detection
If deviceOwl is unable to recognize the device after checking from a few different angles, a summary screen will be displayed which offers you the option to report a sample of this new/undetected device to Entropic Labs for further analysis.
This step is optional, and can help deviceOwl detect this device in a future knowledge update.
Select the "Submit" button to expand the view for device sample reporting.
Note: If you don't want deviceOwl to ask you to report samples of devices, uncheck the "Ask to Report New Devices" option under Owl Cognition Network under preferences.
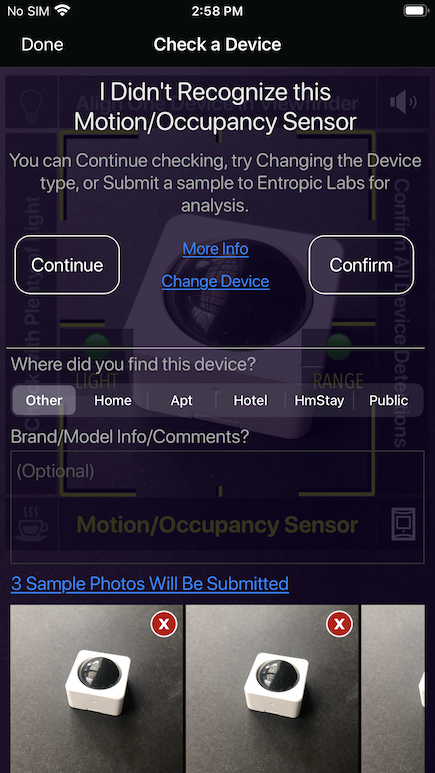
Reporting a Sample to Entropic Labs
From here you can specify where you found the device, add an optional description of the device, review/remove the sample photos that you want to be reported, review the privacy policy, and submit the device sample to Entropic Labs.
More Info button
Select the "More Info" button to view information about reporting samples, and review the Entropic Privacy Policy.
Change Device button
Select the "Change Device" button to change the currently selected device type you are checking.
Review Device Photos
(Expanded View)
The device sample photos captured during device checking, are shown at the bottom of the screen. These will be included with the device sample submission, when you select "Confirm".
Swipe left or right to review these sample photos.
Important: Prior to reporting the sample, please make sure that the sample images don't include personally identifiable information, such as people's faces (including in photo frames), and text/signs.
Removing a Sample Photo
If you don't feel comfortable reporting a specific device photo, simply tap the red X icon on that photo to remove it, so it will not be included with the device sample submission.
Confirm button
(Expanded View)
Select the "Confirm" button to report the sample to Entropic Labs. Once reported, you will be returned to device checking.
Continue button
Select the "Continue" button to close the device sample submission screen, and resume device checking.